
The University of Auckland has been teaching with Granta Edupack since 2015 as part of a commitment to use the latest technology to enhance their Materials Science education.
Below is our recent interview conducted with Dr. Josh Workman who completed his PhD in Biomaterials Engineering at the University of Auckland, and used Granta EduPack in his teaching as a Lecturer in Materials Engineering.

How has Granta EduPack helped enhance Material Science education at the University of Auckland?
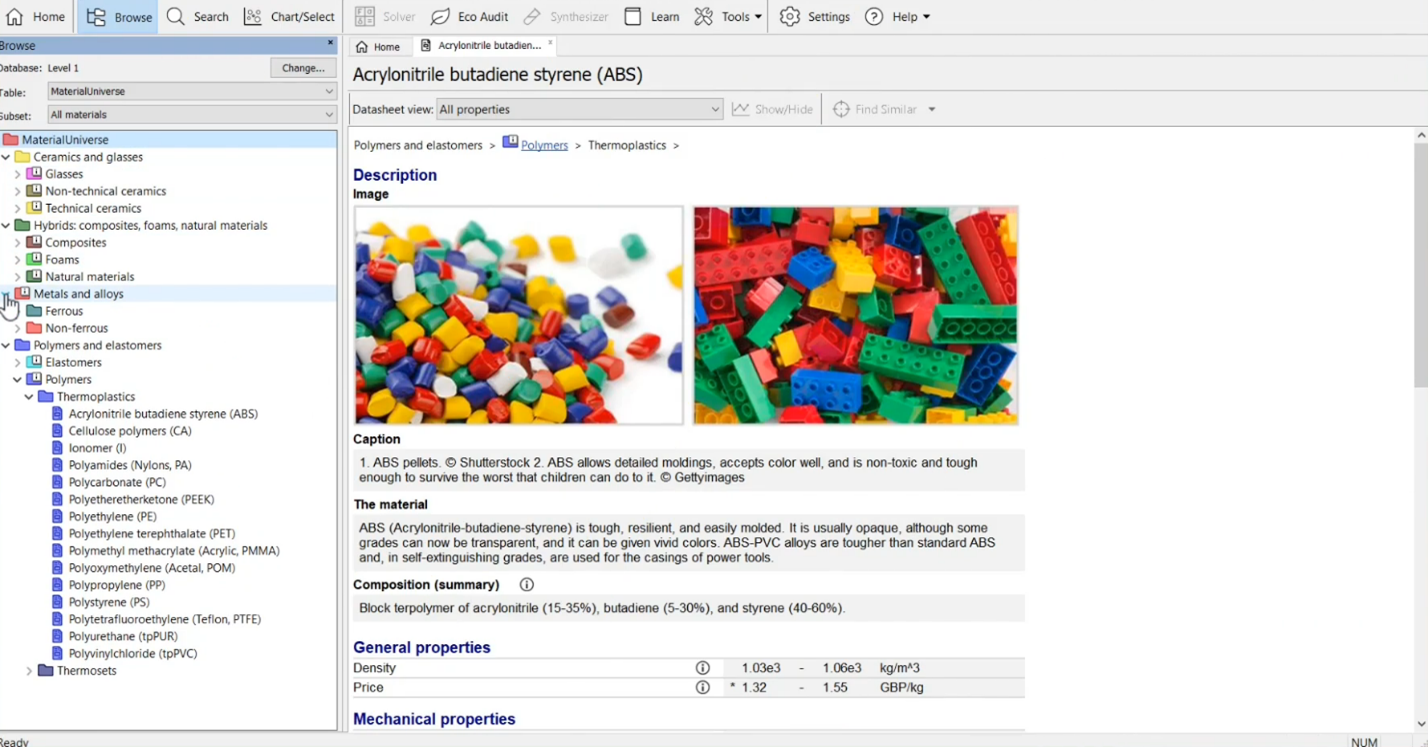
As an educator, I found getting to grips with the software and the ready-made content was very easy. We’re able leverage many of the instruction documents supplied within Granta. It helps that the originator of Granta EduPack is Prof. Mike Ashby who we describe to students as “the grandfather of material selection”.
We’ve had very positive feedback from our students who use EduPack. They really enjoy doing something that’s hands on, not just technical. Moving on from other second year classes which are very focused on theoretical knowledge, they love being able to actually apply this knowledge to a program which is used in industry. For a teaching perspective, it definitely makes life easier as well – especially when it comes time to varying the curriculum and writing unique questions for tests and exams. I can use EduPack to create custom graphs and plots for the students to use, which is really helpful.
It also allows us to easily grab a variety of different examples and make sure that each student has properly understood the concepts and continue to build upon them using a scaffolding approach. I teach EduPack both in a second year class, which is the student’s first introduction to EduPack, but also in an elective class in fourth year – a 700 level paper for biomaterials selection. This fourth year class is a more in-depth look at materials selection using EduPack, which is a good reinforcement for them and I can really dive deeper into the capabilities of the software.
How would you describe the learning curve for your students?
It’s really a pretty quick learning curve. To get them started, I do one introduction in class where I show them EduPack and how to use it, and we review material selection principles. Then I do one lesson where we work through a tutorial, covering everything from the basics up to the synthesizer tool, and then they start using it themselves. It’s very easy to use, and I’m just there to help answer questions and offer guidance. By the end of that two hour session, they’re ready to use EduPack for their own project.
I think EduPack really helps the students to more easily visualize what they’re doing with materials selection, by making it so interactive. It’s a process of taking the same content that is already available to them, like materials properties and graphs, but with EduPack I find that the students really value that interactivity with the material’s properties of interest. They can ‘filter’ to hone in on certain key properties and quickly gain a more intuitive grasp of materials selection for each class of material they are studying. They often have this ‘ah-ha’ moment of “Ah, yes. If I do this, I’m making it better, because of this…” and from that point on, they have a much stronger intuitive grasp of materials selection.
How does EduPack cater to students in different disciplines or with slightly different interests?
Part of our assessment involves a report on an industry process relevant in New Zealand. So each group tackles materials selection for a component from a different industry, such as Dairy, Cement, Wastewater treatment, Aluminum smelting, or Manufacturing. We encourage the students to approach this by thinking “OK, what should our objective function be? What do you think it would be for one of the components in your design? Think about the unique requirements of this component an process. For example, you might be doing a separation process, a blowing device. Think about what are the key constraints and objectives for your specific project, such as food safety, temperature, etc…”
Can you describe the difference in teaching workload between using EduPack and what you might be doing without it?
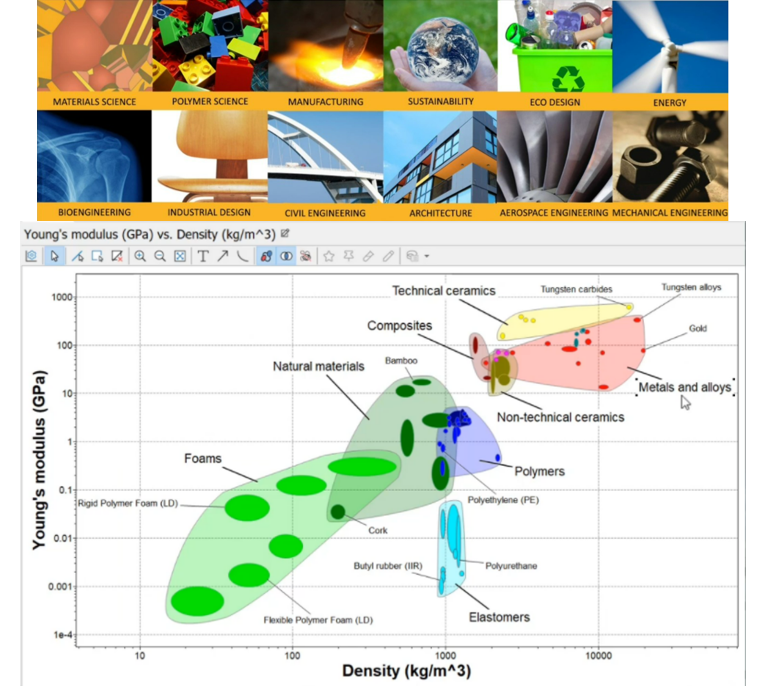
Well, without Granta EduPack we would be obviously be needing to obtain or create Ashby plots from textbooks and create examples from scratch which incorporate a number of different Ashby plots for many different material properties. Then the students would have to work through the process by hand, instead of working interactively with the properties as they do with EduPack.
In EduPack, there is a ready-made example of a milk storage tank. So, we’re talking quite large volumes. The students are usually quite good at picking out the key constraints, things like ‘food safe’ and ‘corrosion resistance’ for those materials. And then they’re able to do a simple hoop stress analysis to work out the forces. And they can use that material property as a constraint or objective as well. Obviously, cost is a big factor in the dairy industry and EduPack makes that easy to compare. When students complete the material selection for this example, we find they do typically come out with suitable materials and we also ask them to compare them to standards, typically stainless steel, and they successfully come up with materials similar to that.
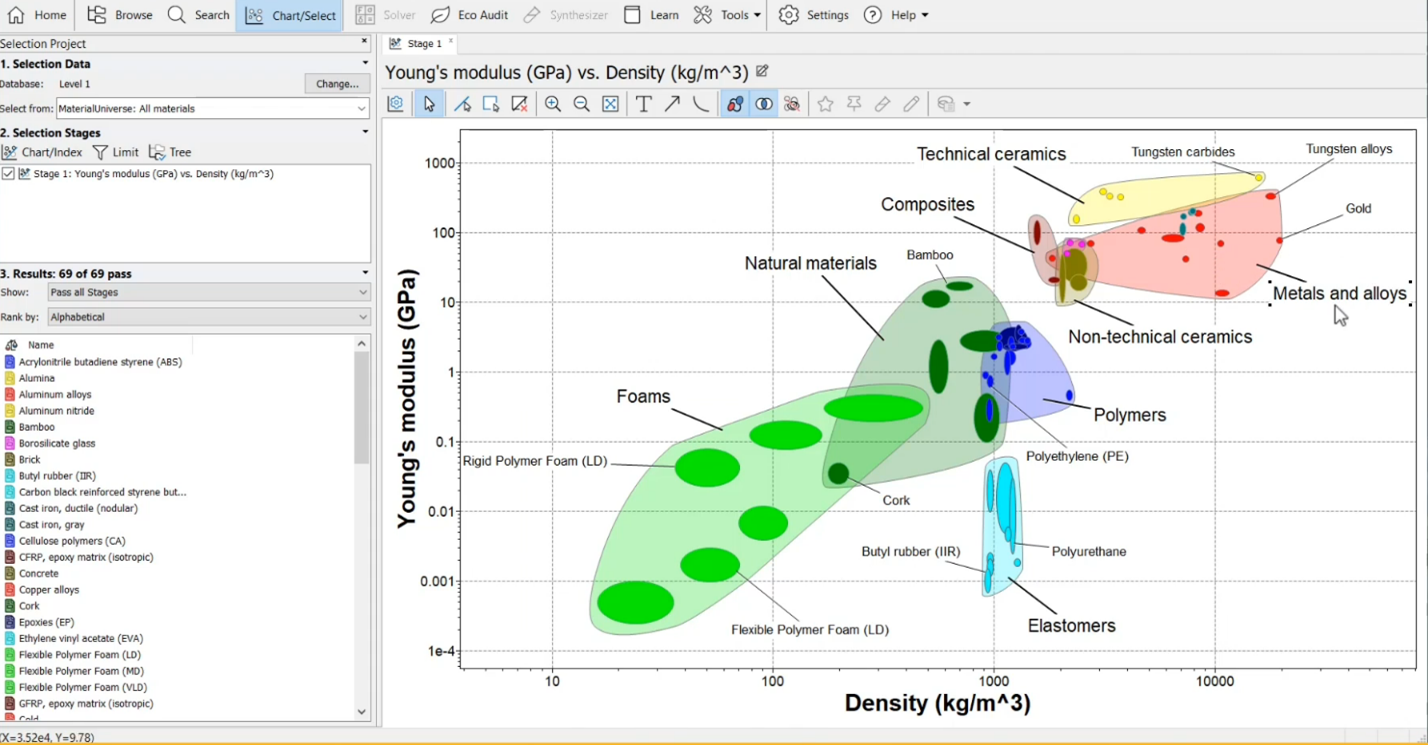
I’m not sure that the students appreciate how hard it would be to do this without EduPack! Using pen & paper to draw these complex graphs is not easy. Luckily, in EduPack you can very quickly just ‘tick a box’ to change these graphs on-the-fly and eliminate materials that don’t meet your criteria. So I think that gaining an intuitive understanding of materials selections would be a lot more difficult for our students without the EduPack software.
What is your favourite teaching resource or tool in Granta EduPack?
I used the resources on the Granta education hub quite a lot, especially the ready-made exercises which help reduce the time needed for lesson planning. For our classes, I took excepts from those exercises to give to my students to practice using EduPack. I also used the case studies to base questions off for tests and exam purposes. For example, in 2021 I’d chosen one of the ones from the “Learn” website from within EduPack – there are multiple examples there for things like pressure vessels, diaphragms, and many others. As an educator, it’s so useful to be able to select an example from there, especially when I’m doing examples live in front of the students. I can just be like, “OK, let’s go and have a look at this one here. These are the design criteria and this is what we’re going to do in EduPack to conduct that material selection.”
What are some advanced features that you also use in EduPack?
In our fourth year class, I also get students to use the synthesizer tool, which is definitely one of the greatest tools I’ve seen in EduPack. Our students really enjoy being very creative with that synthesizer tool to create novel/alternative biomaterials, which has been excellent in getting them to think ‘outside the box’ to meet material selection criteria in ways where they wouldn’t have thought of before.
Can you just describe the Granta EduPack synthesizer tool in more detail?
The synthesizer tool gives you a way to take existing materials and then theoretically create composites out of it. So, you can create things like laminate composites, which have a layered structure of materials, and then theoretically model the properties of that new material and plot the new properties in EduPack. Or students might create a new open-cell form structure, which is useful for things like titanium bio implants, where you can take a porous titanium mesh structure and you can theoretically create that mesh in EduPack and compare it’s properties to existing materials. You can assign goals for material properties such as stiffness or density. For example, you might aim to decrease the stiffness, but also keep the internal volume open, so that you can allow bone growth and things like that. So, if you get more bone growth internally because you’ve got more pores, which means less stiffness. It gives students the ability to navigate these important trade offs that they will face in industry.
What do University of Auckland students find most helpful about EduPack?
A real benefit of EduPack is it invokes this process of ‘self discovery’ as students explore the interactive examples. We’ve recently switched to a flat classroom approach – meaning we break the class into small groups and ask them to use the software in each groups on a different application. I’m able to float around between these groups and give them tasks to do and report back. I find there’s both a valuable dialogue between them and myself during these sessions, and also at the end of the lecture when they report their findings to the class. Sometimes people from other groups raise some other attributes that they didn’t think of, and we explore that more as a class – so it helps improve their understanding of all the factors that must be considered in materials selection.
How important is that materials selection experience once students graduate and move into industry?
I think it’s definitely important, rather than having to learn this on the job. Many of our chemical engineers and process engineers end up in management positions and are in charge of things like purchasing, designing, and building plants from the ground up, or approving large equipment purchases. I know that they use this knowledge once they’re out in industry to systematically think about materials choices for those pieces of equipment and be able to intuitively know what are the key things that they’re looking for.
Find out more about Granta EduPack here and speak with your local LEAP office to get started in enhancing your materials engineering or science curriculum. Click the photo below for more information about materials science education and research at the University of Auckland.